Pages

Showing posts with label Tim Holtz. Show all posts

Wednesday, May 6, 2015

Mother's Day Card With Selective Masking!

Hello! I wanted to share a special card I made a few weeks ago while experimenting with my stamps. I love to try and find ways to stretch my stamps and this is one of my new favorites, so let's get right to it!
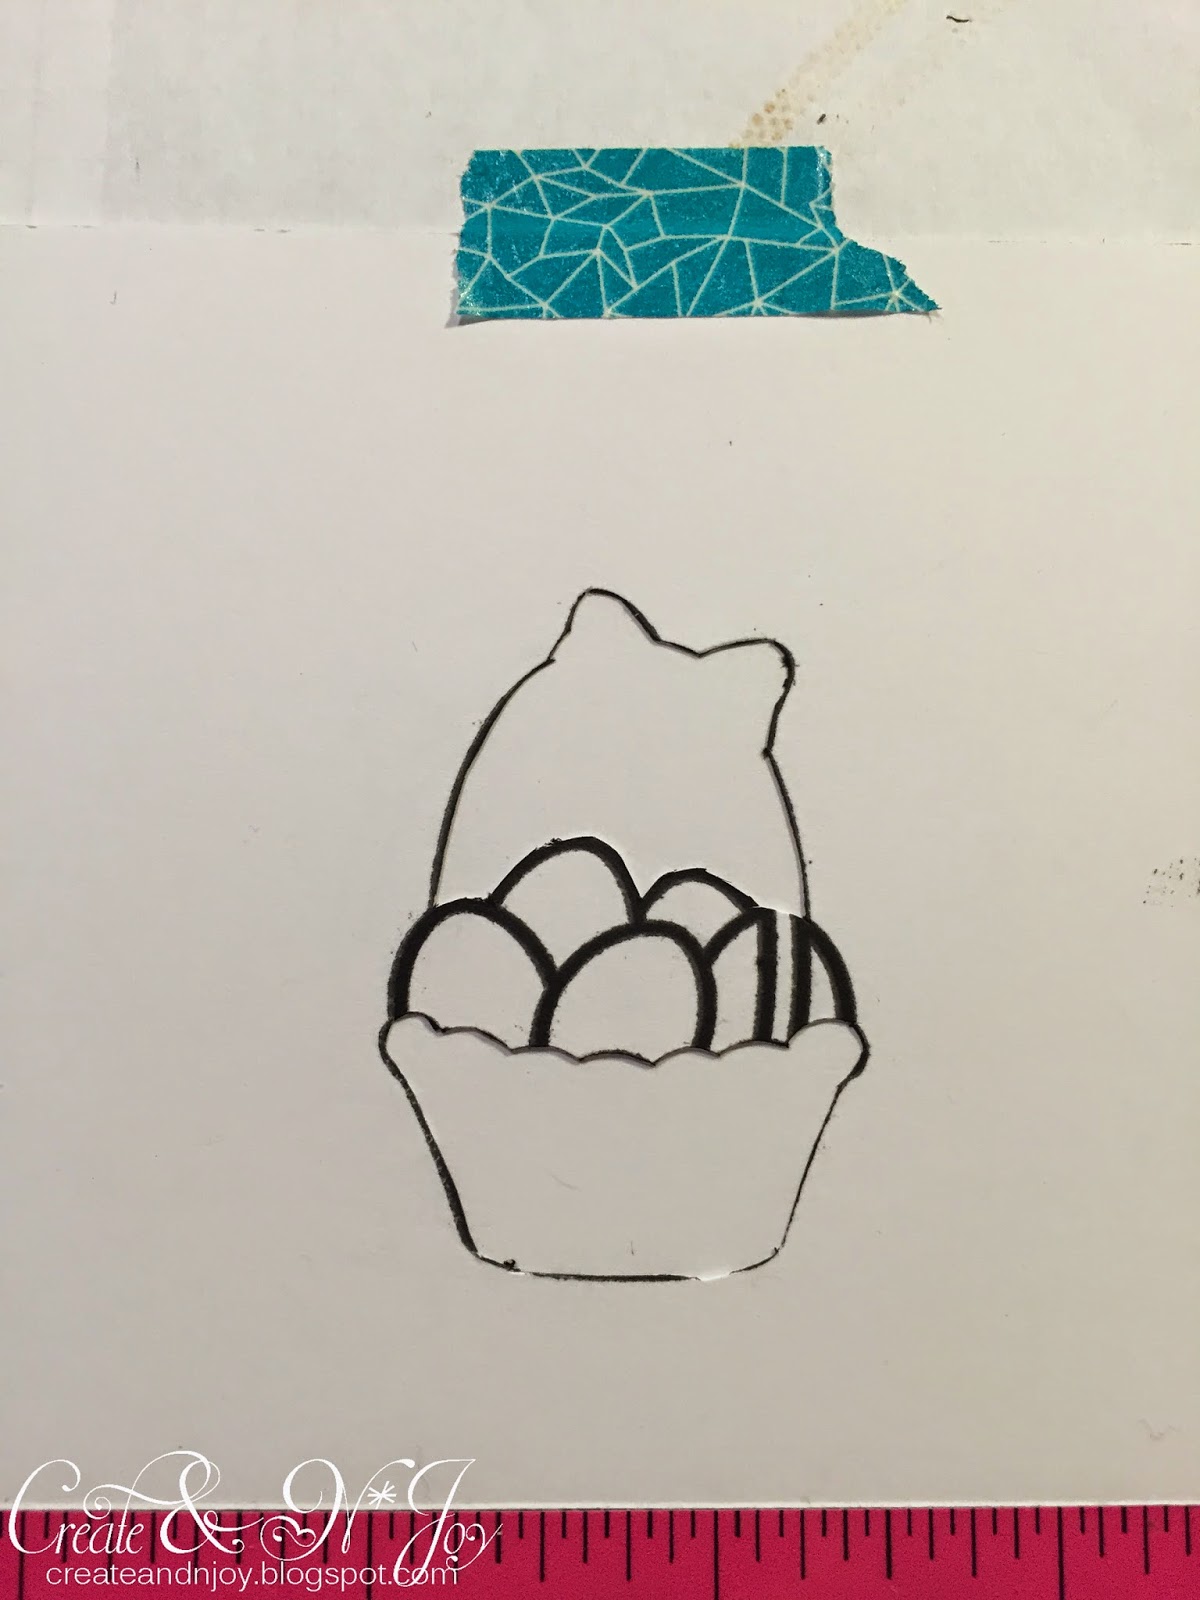
I brought out my super cute, Eggstra Special Easter stamps set from Lawn Fawn I stamped the basket with the eggs inside on some scrap paper, and then cut around the image leaving the eggs attached to create a mask. As you can see in the image below.
 I then cleaned my stamp, placed my card stock under the mask, and lined up my stamp with the mask. I did use my MISTI to get correct placement, but I'm sure you could easily do this using regular acrylic blocks.
 Using Memento Tuxedo Black Ink I stamped my image .
I removed my mask to reveal a cute, but very empty basket.

 I then created a mask just to cover the bottom of the basket, so I could begin stamping the flowers. Using the tulip from the same stamp set I added one at a time using masks to layer them.
 Yup, looks like a hot mess...as you can tell by my well loved basket mask, I made a few of these cards
 Then using my Spectrum Noir markers I colored the image.
 Using Tim Holtz Distess Ink in Mustard Seed and a circle cut from scrap paper I created the card base. I finished it up by using foam adhesive to attach the basket to the card, adding a bit of Wink of Stella clear to the bow, and stamping the sentiment using an old stamp I had in my stash.
 I really think this "new image" is very versatile and could be used for many occasions, such as birthdays, Get Well, Congrats, Happy Spring, You could even replace the flowers with other images like hearts, animals, tools, school supplies, baby items...you get the idea!
Don't be afraid to look at your stamps differently! The possibilities are endless! Thanks for joining me!
I would like to add this card to the following challenges:
Simon Says Stamp: Monday Challenge

Lawnscaping Challenge


Thursday, March 26, 2015

Monster Hugs and Catch Up!

Hello, All! I have been creating like mad in my little corner...sometimes I remember to take photos as I go and other times I get so caught up in the process of it all that it completely slips my mind! I've been trying to be better about it and now I have to play catch up here to get everything posted! So, without any more delay enjoy this very colorful post! 
I am going to use this card for the Simon Says Stamp Wednesday Challenge:Anything Goes
Wednesday Challenge

Originally I was going to use this card as an entry for the Distress Challenge for Lawnscaping, but I read about it a day too late. I like the card and had a blast creating it...I started with three Tim Holtz Alcohol Inks in Stream, Wild Plum, and Butterscotch. 

 Using some felt on a Tim Holtz applicator and a piece of plastic I had cut from some packaging, I applied the alcohol inks over the entire piece.
 I decided these monsters from Lawn Fawn's Monster Mash would be adorable in a tie-dye state. So, I used my StazOn Jet Black ink to stamp the little guys onto the opposite side of the plastic.
 I just love the way they turned out...they look like they're ready to have a good time!
 I fussy cut each critter out.
 Next up I decided that I wanted a little color in the background of my card, but knew to get the full effect of the alcohol inks the immediate background would need to be white, so I used Tim Holtz Distress Inks in Picked Raspberry, Mustard Seed, and Peacock Feathers to create this fabulous rainbow on the card base.
 I then temporarily placed my monsters where I wanted them to go along with Avery Elle's Avery's Alphas stamps to get placement just right.
 I used my wonderful new tool, the MISTI, to ensure perfect lettering.
 I finished the sentiment using the original stamp that came in the Monster Mash set. I then used my Spectrum Noir markers to create another rainbow effect in the lettering.
 I carefully used my Martha Stewart two way glue pen to place glue along the black stamped edge of each image. This is so the adhesive does not show through the clear plastic.
I added a little bit of glitter to the letters using my trusty Wink of Stella clear brush.
 and here is the final product.
 I hope you've enjoyed learning about the project! Feel free to comment or ask questions! Thanks for joining me! Keep an eye out for more posts very soon!

Tuesday, September 16, 2014

Thinking of You Card and Envelope

Hello! Thanks for joining me again to take a look at what's been happening on my craft desk! I wanted to join in the fun at Simon Says Stamp Wednesday Challenge for Create your own background! I have been wanting to try to create my own stencils using some Inkjet Transparencies I found in my stash, but quite honestly, have been too chicken to do it. Once I saw Caryn's wonderful creation I knew this was the chance I'd been waiting for and took it...and am I glad I did! So much fun and I love the results! So, here you go... 
Like I've said, I started with some old transparency film I found.
I used two of my Lifestyle Crafts Nesting Circles and die cut random circles from the transparency. I even kept the pieces that were cut from the plastic in a little baggie to use as masks on later projects.
 After I was satisfied with the pattern I started using my Tsukineko Sponge Daubers to fill in the circles using Tim Holtz Distress inks in Dusty Concord, Tumbled Glass, Tattered Rose, and Antique Linen. These are not usually colors that I reach for ( I love bright colors) but I think the combination is eye pleasing.
 I used a little washi tape to keep my stencil in place, but then ended up moving around quite a bit to cover the whole background. Here is the final background. I think it is happy and fun!

 I selected the Simon Says Clear Stamp Sending Happy Thoughts for the beautiful Thinking of You sentiment along with Versa Mark ink and Zing White embossing powder. I added a few pearls from Michael's Recollection line, and used foam adhesive to attach the sentiment.

 Lastly, I created an envelope for my card because I didn't have one big enough to fit it! The measurements were 4.5"x 6". Ooops. :) Thanks for joining me! What is something You've been wanting to try, but find yourself too 'chicken'?

Thursday, August 28, 2014

Shaker Card- Anywhere with you!

Last night I wanted to try something a little different for me...so I created a shaker card with a scene! I love the end result and intend on doing another one very soon! I got so involved in the process that I forgot to take pictures as I went along...but here is what I have...

I first drew my scene by hand. I knew I wanted a mountain scene, as that is where hubby and I went for our honeymoon, and we now have a funny little story to tell about driving up the mountains!
I also got out my Lifestyle Crafts Nesting Circle Dies to find which circle would fit my need the best. I traced the inside of the circle so I could place my card and trailer stamps in it to make sure they fit properly.
Next, I created a mask for the mountains and sky and with a mini sponge dauber added Tumbled Glass to the sky and Pumice Stone to the mountains.

 Here is the scene starting to come together. This is where I started getting really caught up in the process and forgot to take pictures. :( After I was satisfied with the sky and mountains I used the EK Success Writer Metallic Silver to create a guard rail, then colored my road black and added some dash lines. I finished the scene by adding more Pumice Stone Distress Ink to the bottom part of the card.
 I then ran the card through my Sizzix Big Kick with the Lifestyle Crafts Nesting Circle Die. Using Tombow Mono tape runner I adhered the circle to the base of the card. I added some clear plastic (I cut from a package)behind the front layer, and put some Duck Brand Mounting Foam on the rectangle part of the card.  I stamped, colored, and fussy cut the little car and trailer from Lawn Fawn's Happy Trails, which I glued to the front part of the plastic packaging. I added my punched out hearts and silver sequins to the card and layered the outside part of the scene back onto the card base. Here is my finished happy little card. On the inside I have written, "I'd go anywhere with you."
I'm entering this shaker card into the Simon Says Stamp Wednesday Challenge. It's Anything Goes!

Tuesday, August 26, 2014

Kraft Congratulations!

I have created a card to go along with the Simon Says Stamp Monday Challenge! This weeks theme is Witch Kraft...since I am not crazy about the witch part of the challenge I chose to use the Kraft side of it. I started with a pink A2 size card base and three die cut flowers using The Sizzix Original Flower Layers die with my Big Shot. I then followed Tim Holtz's instructions to create the kraft rose.


 I used the Darice Woodgrain Background embossing folder to add some amazing texture to the card.
 Using the Stampabilities Congratulations I stamped with Versa Mark ink and then used white embossing powder over it. For a little extra detail I used a tiny bit of white acrylic paint and created some paint splatters over the flower and sentiment. To finish off the card I used the We-R-Memory Keepers Corner Chomper on the bottom corners.
 While the card is too bulky to be sent through the mail- I think it would look wonderful attached to the top of a baby shower or wedding gift.

Wednesday, August 20, 2014

In Hopes of Touching A Heart.

We recently had a friend of the family suddenly pass away. He left behind a wife and two children in their 20's. I wanted to be an encouragement to his family, so I created a card to send to them. I once again used The Sea Stamp set from Sweet 'N Sassy stamps along with the Sympathy set from My Sentiments Exactly.
This card while emotionally difficult to make is rather simple. I stamped the boat and sentiment with VersaMark Ink and then heated clear embossing powder over it.
The clear embossed image.

 I used Tim Holtz Distress Inks in Tumbled Glass, Mustard Seed, Faded Jeans, and Pumice Stone to color the image and reveal the stamped scene.

The image with the sentiment was slightly too big to fit a typical A2 card, so I matted it with gray card stock and used an adhesive tape runner to attach it to a 5x5 card base.


The final card

I did decide to post this card as an entry to my first challenge ever over at Word Art Wednesday! I love that I have found an uplifting place that encourages learning and reading God's Word and creating!

 In closing, a reminder- You never know which day might be your last. Take time every day to hug and kiss your family and friends. Tell them you love them.

God is in control. God is good. All the time!
8 For my thoughts are not your thoughts, neither are your ways my ways, saith the Lord.
9 For as the heavens are higher than the earth, so are my ways higher than your ways, and my thoughts than your thoughts.
Isaiah 55:8-9


Monday, August 18, 2014

Send 'Em On! Send 'Em Out!

Have you ever created something that just makes you downright happy?!? Something that you have a difficult time handing over to the person you intended it for? I have. This is one of my favorite (and least favorite) parts of having a creative side. I love knowing that something that came from my desk could make someone else smile, uplift spirits, encourage someone to keep going on their journey, to let a friend know that you're thinking of them, or just to say 'hello'. How exciting is it to get something in the mail that...well, isn't a bill or junk mail?
So, here is a little bit of encouragement to create, play, enjoy and send. Make yourself an address book, keep it with you along with stamps. Address and stamp those envelopes as soon as you finish the card. Get those works of art in the mail...make someone's day!
 Here are a few cards that I was excited to send out. The pictures aren't the greatest, but seeing them still makes me smile!
A birthday card I made for my Aunt Bev.
A funny little card for my nephew!

A thank you card for a wedding gift Sam and I received.

Thursday, August 14, 2014

Build-A-Stash

I bought a few new stamps recently and here is one of my new favorites! I love the serene scene, the KJV scripture, the appropriate quotes. I sat down at my craft desk to create a few cards to add to my stash of 'on hand' cards, so I wanted something fairly simple. The following pictures are what I came up with:

 I first stamped the main image from The Sea set from Sweet 'N Sassy Stamps in Tim Holtz Black Soot.
The Sea Clear Stamp Set
 I then took a mini dauber and pounced a single "Mustard Seed" sun. Followed by a sweeping reflection.
 After I used "Faded Jeans" to create my blue water
 I then added some "Broken China" for the sky and "Pumice Stone" to add a little gray on the water.
 I then decided I wanted to be able to use one of the saying from the set on the front as well,
so I used a circle die along with my "Big Shot" and cut each scene out.

I thought it gave the cards a little more interest to have the main 
focus be off center.
 I used "Faded Jeans" once again to add the  Psalm 89 verse.
 "Chomped" the corners and called them good!
 Here is one of the final cards.

 I love how planning ahead, lining up your projects, and doing the steps all at once helps you create cards in no time! I will be using this process again very soon! I need to get my card stash built up! Of course these cards, once they were finished, were just calling to be written in, addressed, and sent out to encourage a few folks that I know could use a little pick me up. Thanks for joining! Leave me some love-Tell me your favorite time saving tips!

Create On,
Nancy Joy