Pages

Tuesday, September 2, 2014

Neon Hedgehugs!

Hello everyone! I wanted to share a fun little card that I created to play along with the Lawnscaping Challenge number 89!
http://lawnscaping.blogspot.com/2014/09/lawnscaping-challenge-one-layer.html
I'm so glad I've decided to start playing along! These challenges force me to look at my crafting supplies in different ways. I created a few other cards using other stamps that are single layer as well. (maybe you'll see some of them here soon) Anyway, here's the super simple, super fun, single layer card:
I first stamped the hedgehogs, from the Lawn Fawn HedgeHugs stamp set, touching noses in StazOn black ink. I also used the Beep Boop Birthday stamp set for the little bow on the hedgehog. I then stamped them again on some Post-It note cards (so the sticky area is on the back) and fussy cut them so use as a mask. (the extra black ink is from another single layer card I made.)
 I then got out my Americana Neon Acrylic paints...and...painted!
I wish the photos did true justice to these fantastic colors!
 I then used my water color pencils to color in the hedgehogs.
I added the tiny heart stamp above them, along with the cute sentiment that comes with the set.I finished off the card by adding some Glossy Accents to the noses, eye, and heart.
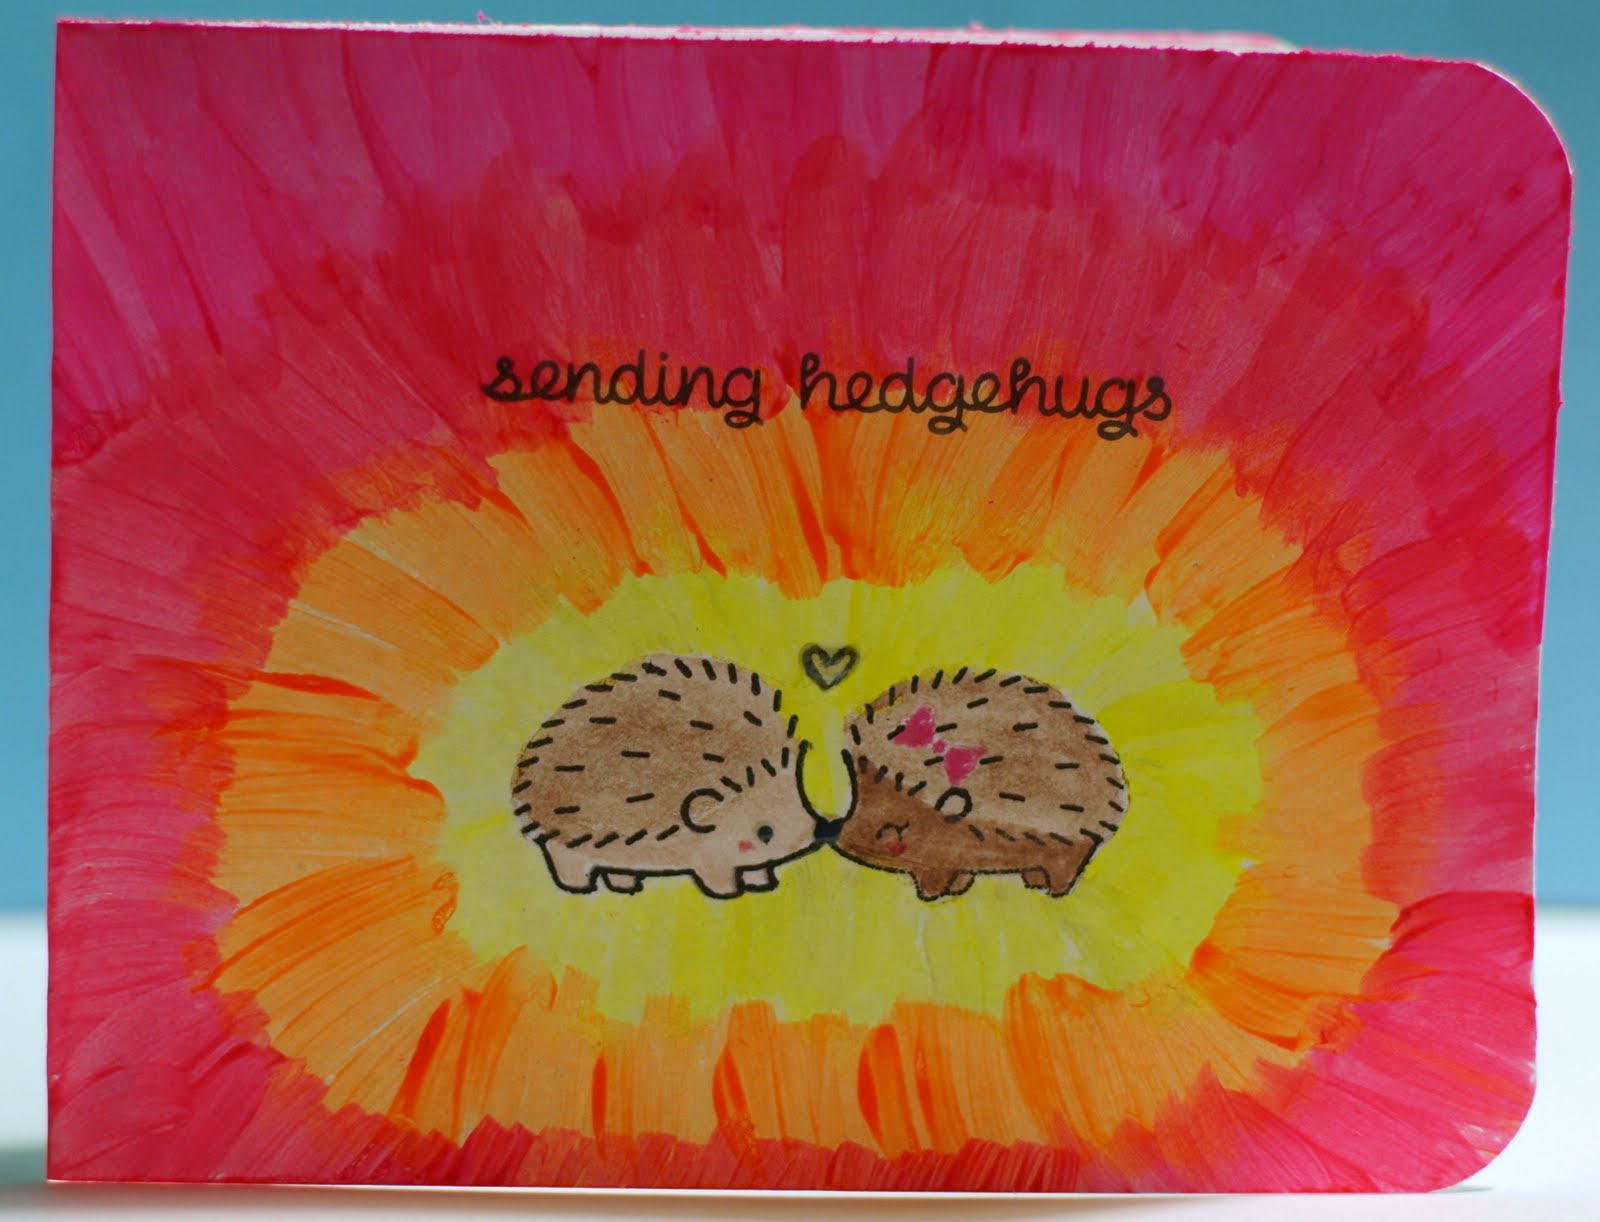
The perfect 'pick-me-up' card that is easy to send through the mail!

Thursday, August 28, 2014

Shaker Card- Anywhere with you!

Last night I wanted to try something a little different for me...so I created a shaker card with a scene! I love the end result and intend on doing another one very soon! I got so involved in the process that I forgot to take pictures as I went along...but here is what I have...

I first drew my scene by hand. I knew I wanted a mountain scene, as that is where hubby and I went for our honeymoon, and we now have a funny little story to tell about driving up the mountains!
I also got out my Lifestyle Crafts Nesting Circle Dies to find which circle would fit my need the best. I traced the inside of the circle so I could place my card and trailer stamps in it to make sure they fit properly.
Next, I created a mask for the mountains and sky and with a mini sponge dauber added Tumbled Glass to the sky and Pumice Stone to the mountains.

 Here is the scene starting to come together. This is where I started getting really caught up in the process and forgot to take pictures. :( After I was satisfied with the sky and mountains I used the EK Success Writer Metallic Silver to create a guard rail, then colored my road black and added some dash lines. I finished the scene by adding more Pumice Stone Distress Ink to the bottom part of the card.
 I then ran the card through my Sizzix Big Kick with the Lifestyle Crafts Nesting Circle Die. Using Tombow Mono tape runner I adhered the circle to the base of the card. I added some clear plastic (I cut from a package)behind the front layer, and put some Duck Brand Mounting Foam on the rectangle part of the card.  I stamped, colored, and fussy cut the little car and trailer from Lawn Fawn's Happy Trails, which I glued to the front part of the plastic packaging. I added my punched out hearts and silver sequins to the card and layered the outside part of the scene back onto the card base. Here is my finished happy little card. On the inside I have written, "I'd go anywhere with you."
I'm entering this shaker card into the Simon Says Stamp Wednesday Challenge. It's Anything Goes!

Tuesday, August 26, 2014

Kraft Congratulations!

I have created a card to go along with the Simon Says Stamp Monday Challenge! This weeks theme is Witch Kraft...since I am not crazy about the witch part of the challenge I chose to use the Kraft side of it. I started with a pink A2 size card base and three die cut flowers using The Sizzix Original Flower Layers die with my Big Shot. I then followed Tim Holtz's instructions to create the kraft rose.


 I used the Darice Woodgrain Background embossing folder to add some amazing texture to the card.
 Using the Stampabilities Congratulations I stamped with Versa Mark ink and then used white embossing powder over it. For a little extra detail I used a tiny bit of white acrylic paint and created some paint splatters over the flower and sentiment. To finish off the card I used the We-R-Memory Keepers Corner Chomper on the bottom corners.
 While the card is too bulky to be sent through the mail- I think it would look wonderful attached to the top of a baby shower or wedding gift.

Monday, August 25, 2014

So very proud of you!

The Simon Says Stamp Company has a couple of challenges you can join! There is a Monday Challenge and the Wednesday Challenge, and occasionally they even have challenges/contests on just their regular blog! I am always finding new ways to create from this company and their wonderful design team!
Anyway, since I had so much fun with the Lawn Fawn challenge last week I thought I'd give another challenge a try. The Wednesday Challenge blog's theme is Back to School. I must admit I do not have any stamps that is specifically 'school themed'. So, I decided an alphabet stamp would most likely work best. I love the way this card turned out. It's so happy and cheerful!

I started with an A2 size card and used Versa Mark Ink and clear embossing powder to randomly stamp Avery Elle's Avery's Alphas stamps all over the background.
 I then used Tim Holtz Peacock Feathers, Picked Raspberry, and Mustard Seed Distress Inks with sponge daubers to blend the inks over the background. After it was blended to my liking I sprayed a little water in my hand and flicked it over the ink. The little droplets of water create a speckled look.
 I then finished up my card by using Avery Elle's What's Up Stamp set for that fantastic giraffe and Avery Elle's Fill in the Blank set for the sentiment. To make the sentiment stand out a little I added some Clear Stickles over the YOU. Lastly, I used Clear Glossy Accents over the 'glass' part of the glasses.


Friday, August 22, 2014

A Little Play Goes A Long Way

Hello everyone, I wanted to share a card that was inspired by the 88th Lawnscaping Challenge! 

The theme is TEXTURE! Now, I've always been a little wary of using textures because I find that it can sometimes overtake the rest of what is happening on your project. So, I really wanted to try my hand at it and see what would happen...I started rummaging through my craft stash and came across jar of Deco Art Snow-Tex. I knew I had found my texture, but then I needed to decide...did I want to create a desert scene and use it as sand? Or design a house and use it as brick? That's when I saw my Love You S'more stamp set from Lawn Fawn and I knew I wanted textured bears! And yes, I wanted plural...so, I stamped Mr. Bear on white card stock in Black Soot distress ink, placed a clear stamping block behind it, held it to the light and traced the image so I could have the bears facing each other! (genius I know.)


 After I had multiple bears to play with I scooped a small amount of the Snow-Tex into my paint tray along with a few drops of tan acrylic paint and mixed them together. I used the tip of my finger to spread the mixture onto the stamped image. This did obscure the lines so after I dried it with my heat gun I drew over the image with a ball point pen. The dark brown bear (because he is facing the right direction) I simply restamped the him with the stamp again.
 To create my scene I used two old 'masks' I created from simple white card stock and washi tape. I used Mowed Lawn and Peeled Paint for the grass area.
 Then Tumbled Glass for the sky.
 Here is a photo of the card. I handwrote "Love bears all things" along the top of the grassy area. Added a little heart punch with some Glossy Accents on it.
 Here is a close up of my 'fuzzy' bears! I love them! So, in the end I'm very glad I played along and took a chance with texture!


Wednesday, August 20, 2014

In Hopes of Touching A Heart.

We recently had a friend of the family suddenly pass away. He left behind a wife and two children in their 20's. I wanted to be an encouragement to his family, so I created a card to send to them. I once again used The Sea Stamp set from Sweet 'N Sassy stamps along with the Sympathy set from My Sentiments Exactly.
This card while emotionally difficult to make is rather simple. I stamped the boat and sentiment with VersaMark Ink and then heated clear embossing powder over it.
The clear embossed image.

 I used Tim Holtz Distress Inks in Tumbled Glass, Mustard Seed, Faded Jeans, and Pumice Stone to color the image and reveal the stamped scene.

The image with the sentiment was slightly too big to fit a typical A2 card, so I matted it with gray card stock and used an adhesive tape runner to attach it to a 5x5 card base.


The final card

I did decide to post this card as an entry to my first challenge ever over at Word Art Wednesday! I love that I have found an uplifting place that encourages learning and reading God's Word and creating!

 In closing, a reminder- You never know which day might be your last. Take time every day to hug and kiss your family and friends. Tell them you love them.

God is in control. God is good. All the time!
For my thoughts are not your thoughts, neither are your ways my ways, saith the Lord.
For as the heavens are higher than the earth, so are my ways higher than your ways, and my thoughts than your thoughts.
Isaiah 55:8-9


Monday, August 18, 2014

Send 'Em On! Send 'Em Out!

Have you ever created something that just makes you downright happy?!? Something that you have a difficult time handing over to the person you intended it for? I have. This is one of my favorite (and least favorite) parts of having a creative side. I love knowing that something that came from my desk could make someone else smile, uplift spirits, encourage someone to keep going on their journey, to let a friend know that you're thinking of them, or just to say 'hello'. How exciting is it to get something in the mail that...well, isn't a bill or junk mail?
So, here is a little bit of encouragement to create, play, enjoy and send. Make yourself an address book, keep it with you along with stamps. Address and stamp those envelopes as soon as you finish the card. Get those works of art in the mail...make someone's day!
 Here are a few cards that I was excited to send out. The pictures aren't the greatest, but seeing them still makes me smile!
A birthday card I made for my Aunt Bev.
A funny little card for my nephew!

A thank you card for a wedding gift Sam and I received.